
Sorry. Wrong Number.
- Maureen Bachmann
- Jul 19, 2019
- 3 min read
Updated: Oct 11, 2020

I’ve had a number of requests to share how I create my assemblage art. I’m not quite set-up to create a video of the process but I did remember to take photos as I worked on this piece entitled, “Sorry. Wrong Number.”
I haven’t been super-detailed or included a materials list as this post is meant more to be informational rather than instructional. Enjoy!

I try to work with used bases whenever I can. This is a masonite panel I painted a few years ago. The first thing I did was base coat the panel with some white acrylic paint. Why apply a base coat? The pattern on the panel was a little distracting and I didn’t want it to influence my decision for the new piece. Why paint and not gesso? The white paint was within my reach. Why white and not black? See previous answer.

As this was a piece using telephone parts I wanted to include numbers in several ways. The first was to add a number texture to the background by using modelling paste through a stencil.

I tend to create on the diagonal so I added the texture in the opposite corners.

Once the modelling paste was dry I started to “audition” components for the piece. Larger components go on first and form the base for the design.

Next came some more numbers.

Once I know what my base components are I’ll glue them on and then cover them with black gesso. It’s much easier to get the gesso into all the nooks and crannies by working in layers rather than gluing everything on and then trying to maneuver a paintbrush into some tiny gap. If I have components that will be sitting up off the base (like the green circuit boards in the previous photo) I’ll paint the underside before I glue them on.

I continue to audition components, glue them on, and cover in gesso.

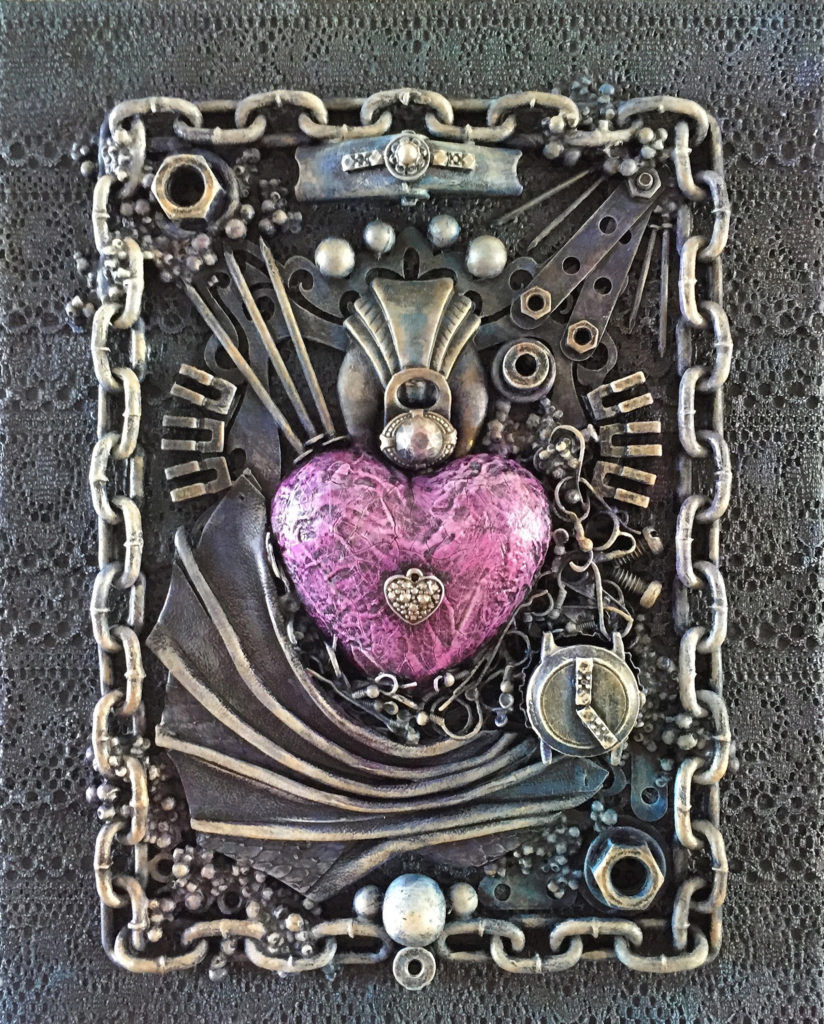
Here’s the piece with all of its components glued in place. Lots of little details were added in the final layer. The heart lost it’s ball chain border but gained some power cord straps.
I’ll add at least one more coat of black gesso, making sure to examine the piece from all angles to ensure it gets fully covered.

The next step is to dry brush white gesso over the entire piece. This allows the colours I’m going to add to stand out better while still maintaining the dark shadows in all the nooks and crannies.

As white gesso tends to be somewhat translucent I dry brush two or three coats onto the piece. The last coat usually covers just the highest components.

Here’s the first layer of my colour spray. As the spray soaks into the gesso the next layers will have a more even colour.

This is the piece after four layers of colour.

The next step is to go back in with the white gesso and dry brush components just to highlight them. This requires a really light touch. From this point on I no longer add any dry brushing to the background, just to the dimensional components.

Oh how I wish you could see the shimmer. I dry brushed some silver and gold decor wax onto the piece. I also attached the tiny wires to the heart and lifted some of the colour from the background with a baby wipe.
A final attempt to show the metallic highlights on this piece.
I hope you enjoyed the post and have a better understanding of my creative process. Please comment below with any questions you might have.


Comments